By PURPLELEC | 19 January 2026 | 0 Comments
Enable SSD Hardware Encryption (SED) for BitLocker
Introduction: Why Choose Hardware Encryption?
In the realm of Solid State Drive (SSD) technology, the Self-Encrypting Drive (SED) is an often overlooked yet highly valuable security feature. Unlike traditional software encryption (such as BitLocker in its default state), SED utilizes the drive's master controller chip to perform low-level hardware encryption. This means the encryption and decryption processes occur entirely within the drive, independent of CPU resources, thereby avoiding the performance penalty associated with software encryption.
However, activating SED functionality in a Windows environment is not straightforward. The system often defaults to performing software encryption via the CPU rather than invoking the drive's internal hardware encryption engine. This article details how to force Windows BitLocker to utilize an SSD's SED capabilities for efficient and secure data protection.
Core Technology Analysis: Security Mechanisms of SED and NVMe
What is SED?
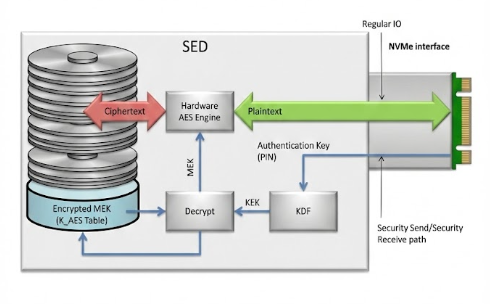
The core of SED technology lies in its built-in cryptographic processor. When data is written to the NAND flash, the controller automatically encrypts it; when read, it automatically decrypts it. This mechanism not only prevents data leakage if the drive is stolen but also supports instant "Crypto Erase" by simply discarding the encryption key.

The core of SED technology lies in its built-in cryptographic processor. When data is written to the NAND flash, the controller automatically encrypts it; when read, it automatically decrypts it. This mechanism not only prevents data leakage if the drive is stolen but also supports instant "Crypto Erase" by simply discarding the encryption key.
Hardware Encryption vs. Software Encryption
- Software Encryption: Relies on the operating system and CPU calculations. Performance may significantly degrade when reading or writing large volumes of small files.
- Hardware Encryption: Executed independently by the SSD controller with "zero" impact on system performance. Encryption keys are stored in a secure hardware area, making them extremely difficult to brute-force.
Deployment Prerequisites and Environment Preparation
Before starting, you must strictly verify that your hardware environment meets the following standards; otherwise, hardware encryption mode cannot be triggered.
1. Hardware Compatibility Check
- SSD Support: Confirm that the target SSD supports TCG Opal 2.0 or IEEE 1667 standards (verify via manufacturer specifications or using the nvme-cli tool).
- Motherboard Firmware: It is recommended to update to the latest UEFI version.
2. Key BIOS/UEFI Settings
- Disable CSM (Compatibility Support Module): You must completely disable the Compatibility Support Module to ensure the system runs in pure UEFI mode. This is the foundation for modern NVMe boot and security features.
- Enable Secure Boot: It is recommended to enable Secure Boot to enhance system integrity verification.
Step-by-Step Implementation Guide
Step 1: Initialize Drive Encryption Status
Most SED-capable SSDs do not have this feature activated out of the box. Users need to use the manufacturer's management tool (e.g., Samsung Magician, WD Dashboard, etc.) to enable the "Encrypted Drive" or "Ready to Enable" state.
Note: This step is usually irreversible and requires a PSID Revert or Secure Erase to take effect. Be sure to back up your data, as this operation will wipe all content on the drive.
Step 2: Disable TPM SID Blocking (Critical Step)
Windows 11 and modern systems rely on the TPM (Trusted Platform Module) for security authentication. The Block SID Authentication feature in the TCG protocol may prevent the system from taking over the drive's encryption authority. You need to disable this feature as follows:
1. Create a Windows To Go boot drive or boot from a secondary drive (since the target SSD is about to be formatted).
2. Run PowerShell as an administrator.
3. Enter and execute the following commands to disable Block SID:
Power Shell
$tpm = gwmi -n root\cimv2\security\microsofttpm win32_tpm
$tpm.SetPhysicalPresenceRequest(97)
$tpm.SetPhysicalPresenceRequest(97)
4. Reboot the computer after execution. The system may prompt you to press F10 or another key to confirm the TPM setting change.
Step 3: System Installation and Policy Configuration
1. Clean Install Windows: Reinstall the Windows operating system on the target SSD that is now in the "Encrypted Drive" (Ready) state and has been erased.
2. Configure Group Policy: After installation, you must force BitLocker to use hardware encryption.
- Run gpedit.msc to open the Local Group Policy Editor.
- Navigate to: Computer Configuration > Administrative Templates > Windows Components > BitLocker Drive Encryption > Operating System Drives.
- Find and double-click: "Configure use of hardware-based encryption for operating system drives".
- Set to "Enabled", and ensure "Restrict use of BitLocker to hardware-based encryption" (i.e., disable fallback to software mode) is checked.
Step 4: Activate BitLocker
After completing the above configurations, open the Control Panel and enable BitLocker for your drive.

- Sign of Success: During the encryption process, if the progress bar completes instantly (or shows "Waiting for activation" instead of a slow percentage progress), it indicates that hardware encryption has successfully intervened.
- Comparison: If it were software encryption, converting a large-capacity drive would typically take hours, whereas SED hardware encryption is virtually instantaneous.
Step 5: Restore Security Settings
To maintain high system security, it is recommended to re-enable the TPM Block SID feature after encryption is successful.
1. Enter PowerShell (Administrator mode) again and execute:
Power Shell
$tpm = gwmi -n root\cimv2\security\microsofttpm win32_tpm
$tpm.SetPhysicalPresenceRequest(96)
$tpm.SetPhysicalPresenceRequest(96)
2. Reboot the computer to confirm the change.
Conclusion
By correctly configuring SED, users can enjoy the extreme performance of NVMe SSDs while obtaining enterprise-grade data security. Although the configuration process involves BIOS adjustments, TPM command interactions, and Group Policy modifications, for power users seeking a balance between performance and privacy, this is not only a necessary means to unleash hardware potential but also a crucial step in building a trusted computing environment.
The Engineering Behind a High-Performance USB Hub Circuit Board
Choosing the Right Port: Thunderbolt 4 and USB-C
Leave a Reply
Your email address will not be published.Required fields are marked. *